quick and dirty costume bonnet tutorial
Here’s a fairly quick and fairly easy tutorial for a bonnet that I whipped up today. If you are planning a pilgrim/pioneer/villager/amish costume, read on. The rest of you, tune out — then come back tomorrow when there will be less specific and more accessible Halloween fun.
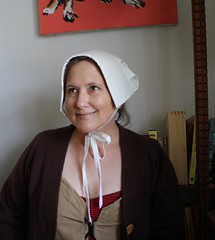
As part of a group costume, I’m going to be a “generic peasant from a generic time in history”, hence I need a “generic bonnet”:

I will divulge the details of this group costume after Halloween!
Here’s what you need to make an costume bonnet for an adult:
- A piece of cardboard, approximately 5″ x 16″ (note: wrap the cardboard around the top of your head to customize your fit. Some may want to cover their ears completely, others may want their ears partially free, like me)
- Two pieces of low-loft cotton batting to cover both sizes of the cardboard (note: this was intended to cover up the cardboard and to add a bit of comfort. You could go without, I’m sure)
- Spray-on adhesive (to adhere the batting, if wanted. You could also use double-sided tape or staples)
- Four pieces of cotton fabric (I used unbleached muslin):
- A piece that is double the width of your cardboard plus 1″, and 2″ longer than the cardboard’s length. For example, if your cardboard is 5″ x 16″, you want a piece of fabric 11″ x 18″.
- One piece, 9″ x 25″
- 2 thin strips about about 1.5″ x 16″ (for the bonnet ties; you can also use ribbon or other tie-like things)
- A sewing machine (see “Before you start,” below)
- Needle and thread (thread preferably same color as your fabric)
- Scissors, chalk (or pencil), pins
- Iron
- A head of some kind; since I didn’t have another human in the house, I used a styrofoam wig head to hold the bonnet in place; I also tried on the bonnet on me throughout the making process to make sure things were going the right way.
Before you start:
- This project took me a little over 3 hours, including screwups and re-dos.
- I will be telling you to sew through the batting-covered cardboard, as well as fabric. My machine did fine, but you might want to test yours.
- You could certainly do a quicker-and-dirtier no-sew version of this bonnet, using tape and staples. if you want to go that route, comment here and I can help.
Let the fun begin! First, give all your fabric a nice pressing.
Cardboard time! A side from a 12-pack of Diet Grapefruit Soda works great as your piece of cardboard; just the right size (click any picture to enlarge):
Spray a side of the cardboard with adhesive, smooth a piece of batting over the surface, then trim to fit. Repeat on the other side.
Now, you’re basically making a tube of fabric to fit your cardboard. Wrap your cotton around the cardboard; mark the joining points of the fabric. Sew where you marked. Turn the tube inside out, press.
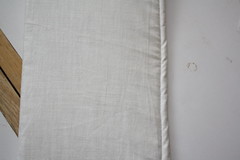
Slide the cardboard inside the fabric tube. If your tube is too tight, rip your stitches (or use a new piece of fabric) and try again. If the tube is too loose, roll a long edge down and run a stitch, as I did here:
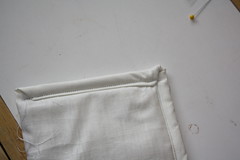
Finish the short ends by folding the fabric’s raw edges down and in, like a package. Then sew.
I’m going to call this piece the bonnet band.
Here’s where we make the bonnet ties. Either follow these instructions, or use ribbon. Fold each long strip in half, then half again, until you get about a 1/4″ of fabric. Press to hold the folds, then run a stitch on the long edge. Remember: nothing has to be perfect, especially if you’re a peasant!
Finish the ends by tying a knot about 1″ from the end, or run a quick stitch at the end:
Sew the bonnet ties to your bonnet band. Make sure you sew them to the inside of the band, about 2″ from each end.
I sewed a rectangle on each tie, for strength. Here’s what the inside looks like:
And the outside. Quick and dirty, people!
Take your 9″ x 25″ fabric and cut a slight curve on one of the long side of the fabric. Exactitude is not necessary. Here’s the general idea:
Finish all edges but the long, straight edge by rolling or folding the edges and sewing a seam:
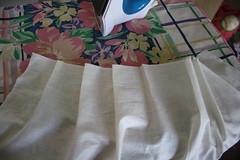
On the straight, long side, iron in some pleats, as shown.
Adjust until your pleats until that side is the same width as your bonnet band. Then pin. You’re pinning on the inside (wrong side) of the bonnet band.
Sew it. I ran two stitches, myself, so that the pleats were secured close to the edge of the bonnet band. This is what you have so far:
You might want to attach your bonnet to a head of some kind at this point. This is where we’re going to gather the fabric to make the poofy back of the bonnet. If you prefer to attach some elastic instead, go for it. But here’s my quick and dirty way:
Thread a needle and knot it so you have double thread — about 2 feet will do.
Sew a wide stitch along the seam of the fabric you just attached to the bonnet band. Starting at one end of the bonnet band, sew stitches about an inch long.
As you sew, you can start tugging on the thread so that the fabric starts to gather together. See where we’re going with this?
After you sew the whole way around, back to the other side of the bonnet band, play with your thread length and gathers to find the look you like:
Here’s where you want to try the bonnet on the person who’s going to wear it, to adjust the gathers to fit their head.
Once satisfied, tie off the thread and you’re done. The gathers will hide the thread pretty well.
Here are some views of the completed bonnet:
Enjoy! I hope this helps someone looking for some prairie action. At least, it will help me if I have to make another one, ever again.
Love from great-great-great-great-great-great-great gramma
You can see a few more photos on my flickr photo set here.


BRAVA!!! That came out fabulously!!! 🙂
Now THAT is one sexy BONNET!
Go you with the awesome job!!!
(I have a temporary blog 🙁 My normal one is down at the moment!)
I got the URL wrong issues!
As cute as that bonnet is – I’m sure glad we don’t have to wear them anymore. Imagine if you got a crimp in your tin can. Wouldn’t be pretty.
Great bonnet, and thanks for a great tutorial!
I sew, you sew, we all sew! http://www.weallsew.com
SUPER AWESOME!!! I so want one,,, ill pay u for it 6 dollars ,, Can u make me 2 one an adult size and one a toddler I want the adult one 3 in instead of the 5inches u made here..and I want it alittle passed my ears..and the toddler on 0ne inchand stopped at the ears…if u can please get back to me I want to wear them for out thanksgiving dinner:]
great! I need a bonnet! young scrooge’s girlfriend this year, and I’m going for the downer and dirtier staples and/or glue gun version! Thanks